
When it comes to keeping little explorers safe, a DIY child gate is a parent’s best friend. Forget spending a fortune on fancy gates that might not even fit your space. With a little creativity and some basic tools, anyone can whip up a custom gate that’s both functional and stylish. Plus, think of all the bragging rights when friends ask, “Where’d you get that?” You can confidently reply, “Oh, I made it myself!”
Overview of DIY Child Gates
DIY child gates offer a practical and cost-effective solution for ensuring safety in homes with young children. Crafting a custom gate allows parents to tailor the design to fit specific doorways or staircases. Basic materials like wood, hinges, and latches provide sufficient resources to create a sturdy and reliable barrier.
Safety is a priority when choosing materials. Selecting non-toxic finishes ensures that the gate remains safe for little ones who may touch or chew on it. Sturdy components can guarantee that the gate withstands the pressure kids may place on it while climbing or pulling.
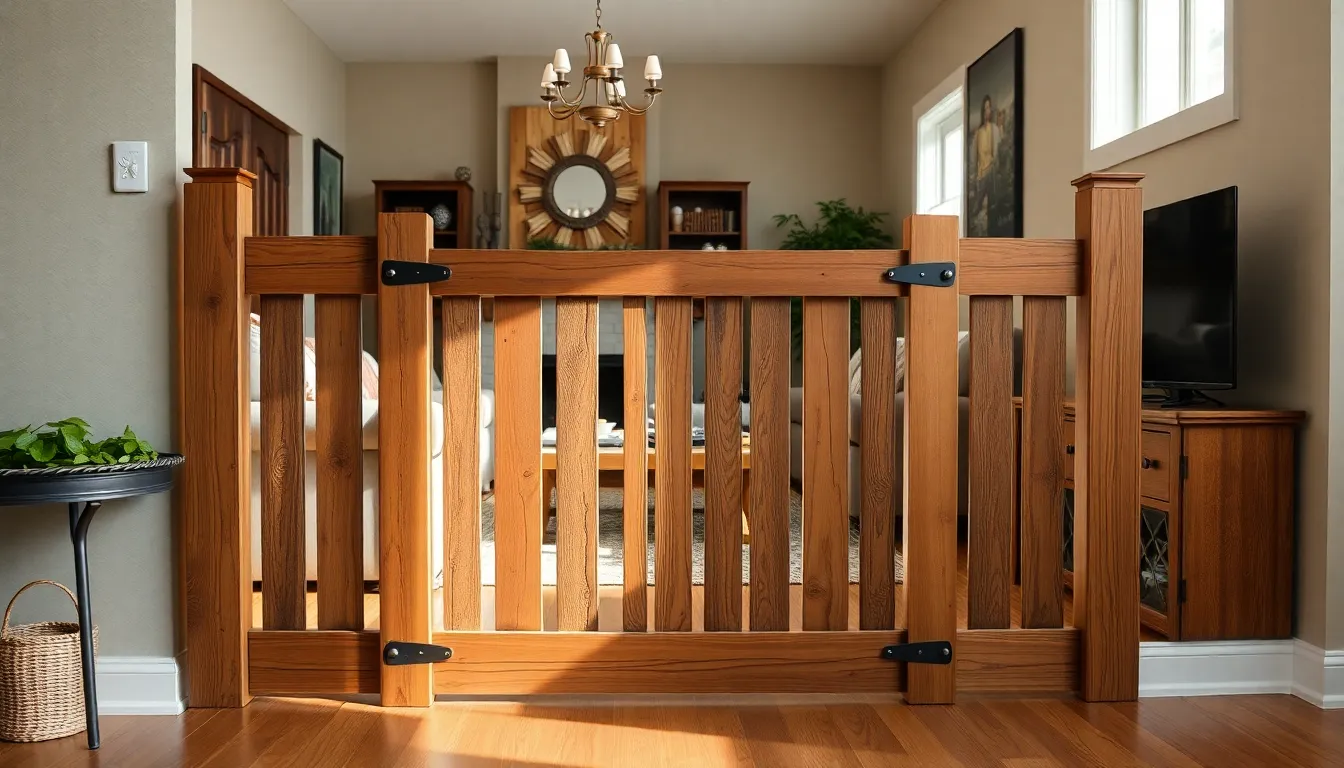
Design versatility comes into play with DIY gates. Parents can choose a style that complements their home decor, enhancing the overall aesthetic. Various designs include traditional wooden gates, modern lattice styles, or even colorful painted options, allowing creativity to shine.
Time invested in building the gate pays off with a sense of accomplishment. Parents often feel proud to have created a solution for their children’s safety, boosting their confidence in DIY projects. Savings on purchasing pre-made gates contribute to the decision, as retail options can be costly and may not fit every unique space.
Measurements play a crucial role in the construction process. Accurate dimensions ensure that the gate fits snugly, minimizing the risk of gaps that could pose safety hazards. Consulting guidelines or templates offers valuable support in achieving optimal results.
Engaging children in the project can add an element of fun. Teaching kids about safety and responsibility while crafting the gate instills essential lessons. Through this bonding experience, families can create not just a gate but lasting memories together.
Benefits of a DIY Child Gate
Creating a DIY child gate offers multiple advantages that enhance both safety and aesthetics in the home. Parents gain control over construction, tailoring gates to unique spaces and designs.
Cost-Effectiveness
Choosing a DIY child gate can lead to significant savings compared to purchasing retail options. Basic materials like wood and hardware are often inexpensive, allowing families to build a functional gate for a fraction of the cost. For example, a store-bought gate might cost around $100, while a DIY project could be completed for less than $50. Families often find that this budget-friendly approach doesn’t compromise on quality. Simple tools and easily available supplies make the process accessible, ensuring homeowners don’t break the bank while ensuring child safety.
Customization Options
Customization plays a key role in the appeal of DIY child gates. Crafting a unique design allows parents to match the gate with home decor, enhancing the aesthetic appeal of the space. Various styles can be chosen, from rustic wooden designs to sleek modern variations. Sizes can be adjusted to fit any doorway or staircase with precision. This attention to detail ensures that safety is not only prioritized but also seamlessly blended into the home’s environment. Personal touches, such as paint colors or decorative elements, help reflect individual tastes while keeping children secure.
Materials Needed for Building a DIY Child Gate
Creating a DIY child gate involves selecting the right materials to ensure safety and durability. The following sections provide essential insights into choosing the best options.
Wood vs. Metal
Wood serves as a popular choice for child gates due to its aesthetic appeal and ability to match home decor. Many prefer wooden gates for their warmth and traditional style. Various wood types, such as pine or oak, are available, offering different levels of strength and finish. On the other hand, metal gates often provide superior durability and security. Metal constructions resist wear and tear, making them ideal for active households. Consider the environment in which the gate will be used when deciding between wood and metal. Each material has distinct advantages, with wood providing charm and metal offering robust protection.
Tools Required
Building a sturdy child gate requires specific tools for precision and safety. A measuring tape ensures accurate dimensions for a perfect fit. Circular saws or hand saws cut the wood or metal to the desired size. Drill machines secure hinges and latches, providing stability. Wood clamps hold pieces together during assembly, ensuring clean joints. Sanding tools smooth rough edges, enhancing safety by preventing splinters. Finally, protective gear, including gloves and safety goggles, is essential for ensuring safety during the construction process. Having the right tools simplifies the building process, leading to a successful DIY project.
Step-by-Step Guide to Building a DIY Child Gate
Creating a DIY child gate involves careful planning and execution. This guide outlines the essential steps for a successful build.
Planning and Measuring
Determining the appropriate dimensions is crucial. Measure the width and height of the intended area for the gate. Use a tape measure to ensure accuracy, as a snug fit prevents safety hazards. Sketch a simple design that aligns with personal style while maintaining function. Consider the placement of hinges and latches, as these components affect the gate’s stability. Visualizing the final product helps in the planning phase while ensuring a practical design.
Constructing the Gate
Select quality materials suited for durability. Wood provides aesthetic appeal, while metal offers sturdiness. Cut the materials according to the predetermined measurements. Assemble the frame first, ensuring all corners are squared properly. Attach vertical slats or bars for safety, spacing them adequately to prevent gaps. Securely fasten all components using screws or brackets, as this strengthens the gate. Sand any rough edges to enhance safety and ensure a smooth finish.
Installing the Gate
Position the gate at the chosen site, ensuring it opens in a safe direction. Attach hinges to one side at an appropriate height for easy access. It’s essential to mount latches on the opposite side for security. Align the gate properly before securing it to the wall or door frame. Test the gate’s operation, adjusting as necessary for smooth functionality. Confirm the gate closes securely and locks easily to ensure child safety at all times.
Safety Considerations
Safety stands as a top priority when building a DIY child gate. Selecting non-toxic finishes helps ensure that children remain safe from harmful chemicals. Opting for sturdy components, such as durable hinges and high-quality latches, effectively withstands the pressures children may apply.
Accurate measurements become essential to avoid gaps that could pose safety hazards. Gates should fit snugly within the doorway or at the top of the stairs to eliminate any risk of children slipping through. Testing the gate’s operation is critical; it should close securely and lock easily to prevent accidental openings.
Parents also need to consider the height of the gate. A height of at least 30 inches often deters young children from climbing over. Additionally, the spacing between vertical slats must not exceed 3 inches to prevent kids from getting stuck or attempting to climb.
Engaging children in this project contributes to a learning experience about safety and responsibility. Involving them in discussions about where to place the gate reinforces the importance of safety measures within the home.
Regular maintenance of the gate is vital to ensure long-lasting safety. Routine checks on hinges and latches help identify any wear or malfunction early, allowing for prompt repairs.
Creating a stylish yet safe child gate combines aesthetics and functionality. By prioritizing safety during the design and construction process, parents foster a secure environment while enhancing home decor seamlessly.
Conclusion
Creating a DIY child gate offers parents a practical and rewarding solution for child safety. By crafting a custom gate, they not only save money but also gain a sense of accomplishment. This project allows for personalization that fits both the home’s decor and specific safety needs.
With careful planning and the right materials, building a child gate can be a fun and engaging experience. Involving children in the process fosters learning about safety and responsibility. Regular maintenance ensures the gate remains secure over time. Ultimately, a DIY child gate is more than just a barrier; it’s a testament to creativity and a commitment to a safe home environment.